 The magic of bunting!
I stuck up the sheets of mosaic onto the pillars last week using an adhesive similar to plaster. I used a builder's float to slap the adhesive onto the pillars and then scored the plaster with the grilled edge of the float to create a criss-cross surface on the pillar. Bizarrely enough, I studied Construction Studies in school so I'd a good idea of what I was doing. My arms, on the otherhand, were in shock at what I was putting them through!
 Ha ha!
 That 'do not touch' chalk hand was quickly abandoned!
Once the adhesive is dry you can peel away the gumpaper to reveal the mosaic underneath. The way to peel away the gumpaper is to drench it with water, allowing the water to soak in between the tile face and the glue of the gumpaper and then peel it away triumphantly in long wallpaper strips (or so the theory goes).

Half way through
I was maybe a little too excited at the imminent satisfaction of stripping away broad sheets of gumpaper. I thought it'd be fast and incredibly satisfying. What actually happened was that the paper had formed some unholy bond with the tiles and was stubbornly refusing to go anywhere. Soon it became a battle of wills between me, the adult, and the gumpaper, a precocious monster-toddler refusing to go anywhere.

The drenching begins..
I spent days rubbing the paper to within an inch of my fingers' lives. In fact, at one point I was pretty sure that I had completely rubbed my fingerprints away.

Sometimes the gumpaper barnacles would take tiles with them when removed..
Exhausted and fed up, I called over to a friend's house and conversation turned to her delight as a kid of picking at pebble dash on walls. We sat in her kitchen wondering how many Irish pebble dash walls were now bald because of children's eager little fingers when I realised I could use children's thirst to pick and peel to overcome the monstrous gumpaper!

One of my lovely helpers.
The next day, in the middle of the whole school being in a great flurry of braiding woolly headbands and dressing up bear mascots for a big match in Croke Park, I asked if I could recruit the help of some small hands to help me peel away the gumpaper.

Four amazing girls were sent my way and they squealed with delight at being asked to help with the mosaic.
It was glorious. We chatted about birthday parties and face paints, conga lines and Aztec houses. And all the while, the paper was receding, being torn down and defeated! Not only that, soon a parent was helping too and a little toddler. They did amazing work and were paid in full (in chocolate cash!) before hometime.

I still have some gumpaper to remove up high and then I'm going to start breaking up tiles to fit into any spaces where there are gaps in the mosaic. After all that is done, I'm going to grout the pillars. And after all that, the mosaic pillars will be completely finished.
Victory!

.jpg)
.jpg)
.jpg)
.jpg) 1. Red Riding Hood waves goodbye...
1. Red Riding Hood waves goodbye....jpg) 2. On the way, she meets dapper Mr. Wolf...
2. On the way, she meets dapper Mr. Wolf....jpg)
.jpg)
.jpg) 5. And chases the wolf away
5. And chases the wolf away.jpg) 6. They celebrate Granny's magical reappearance with cake.
6. They celebrate Granny's magical reappearance with cake..jpg) Caake!
Caake!


 Measure scribbles
 Golden glass cubes
 Tile friends
 This was the original plan for the eggs.
 So I changed the design to an egg on a leaf.
 I drew out the caterpillar design on the gum paper.
 And the caterpillar took shape! Next I lifted up the tiles and wet the gum paper to stick them down. The tiles are stuck down in reverse so that when you glue the sheet to the wall you can wet the gum paper and then peel it away
 All four panels ready to go.
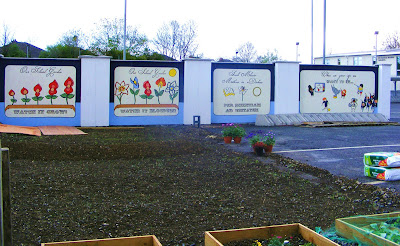


 Little red hoods!
  Coat one finished
 Coat two finished. The black trim begins!


 Almost there...
 Ta da!

